|
|
 |
|
"One Buggy Day" Added on: Wed Nov 21 2001 |
| Page: 1 2 3 4 5 |
Although I expected to achieve the subtle fur effect with shaders, my first attempts did not present a satisfactory result. Particle Array - tool that allows geometry to emit particles - became the solution for this problem: by choosing parts of the bug's mesh as emitters (basically everything except the shells, which didn't need fur) and defining a small size and a high count for the particles, a nice fur effect was created. (Note that this procedure requires a huge amount of RAM)

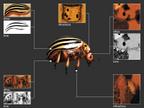
Texturing
The bug was divided in several parts that were textured individually: head, shells, lower body and legs. The mapping methods applied changed according to each part of the geometry (mainly planar and cylindrical mapping). After choosing and applying each UVW map, I used the "Unwrap UVW" modifier to make screen-captures of the unwrapped geometries, and imported all images into Photoshop.
At this time I gathered some reference images and started copying small parts into my texture images, adding as much detail as possible. I removed all the shadows and specular highlights (these will be added in the rendering process). The unwrapped mesh images worked as guides, allowing for the precise positioning of details.
|
 |
|
|


