 |
|||||||||
|
|
||||||||||||||||||
|
|
| Want to leave us a comment about the site or in general? Click here to access the form. |
 |
|
Multiple Texture Mappings by: Jerry Sandefur Added on: Sat Jul 01 2000 |
|
| Page: 1 2 | |
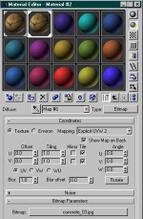
Do the same for "Material 2" in the blend material roll-out but make one very important change, in the "coordinates" area make sure you change the "Mapping" option from "Explicit UVW 1" to "Explicit UVW 2", this is what will make multiple mappings possible later on. Here is an example of what it should look like:  Return to the blend material roll-out and set the "Mix amount" to 50. This will mix the two maps equally. Close the material editor and select the object you want to apply the maps to, then go to the "modifiers" panel in 3D Studio Max and click the "UVW Map" button. Return to the blend material roll-out and set the "Mix amount" to 50. This will mix the two maps equally. Close the material editor and select the object you want to apply the maps to, then go to the "modifiers" panel in 3D Studio Max and click the "UVW Map" button.  Assign a "planar" map to the object in the "Z" axis, then click the "UVW Map" button again and assign a spherical map to the object and make sure you assign it to "Channel" 2, this is very important. This will assign the "Explicit UVW 2" map you created earlier to your object. That's all there is to it. It should look like this: I originally read about this on the comp.graphics.packages.3dstudio newsgroup, it was posted by Stefan Jansson who got it from Steve Burk and it helped me so much with this frustrating problem that I thought I would write this tutorial for others that had not heard of this. |
Best viewed in 1024x768 or higher,
using any modern CSS compliant browser.