Now I had the three important parts of a gate: base, pillars, arch.
Next step is to make the roof and the additional important patterns on the base and on the pillars. I used my favourite pillar again to make the roof. I deleted the half of pillar and scaled (it) up at the end. 
To the base I copied the top pattern of the pillar and I filled the base stone with it. The bended bearer-pillar was made by additional half-pillar. 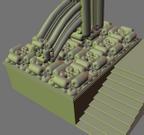
In the center of the gate I used these bended pillar parts again. Now that I got the base lines of the picture I could make the materials and the lights. I constructed a simple material for the stone of the gate. I used various marble textures to control the color, bump, and the reflectivity of the final material. With a procedural marble texture I added red-yellow color to some parts of the material. I used global texture coordinates and cubic projection, so I didn't have to make UVs. Although this could cause some not conspicuous texture break. 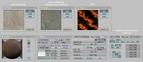
|


