|
|
 |
|
"Time Machine" Added on: Fri Apr 07 2000 |
| Page: 1 2 3 4 5 6 |
ChalkBoard
My challenge with the chalk board was texturing of the board. I don't have a large chalk board but my kids have a Little Tikes chalk board. I used my digital camera to take a few shots of the board with blank swipes for the main background. I blended these together in Photoshop to make a blank chalkboard.
Next, I needed to put the formulas on the board. I couldn't write everything down at once and take one photo. I had to write one formula at a time. The scale of the swipes in the backrgound of the single formula images wouldn't be to scale of a large chalkboard. Therefore I took the series of formulas and put them all together and composited them on top of the blank board and in the process removed the background of each of the single
chalk board formlua shots and resulted in the final image below.
 
Fan
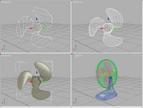
The spline cage was used with this model as well. Here you see my reference image. It never has to be identical to the final peice. As long as it just gives you a guide. As with the shopping cart I used splines for the fan blade cage. This kept the mesh intesity down, keeping the file to a manageble size. Mesh smooth was used for the body and the blades.
Below is a quick series showing the base shape of the blades from rough polygon shape, meshsmoothed through to final render piece. The blade started as a low poygon cylinder. Then one side was extruded out to create the blade. The blade was shaped to the desired form and finally duplicated in a rotation for the other two blades. The resulting mesh was welded together and meshsmoothed.
 
Blender
The blender was mainly created using box modeling and meshsmooth.

|
 |
|
|

