|
|
 |
|
Making of BMW Z3 Added on: Mon Nov 13 2000 |
| Page: 1 2 3 4 5 6 7 8 9 |
First Save your file then select red and pull leftmost vert out to look like this.
Still in left viewport, I just rotated 90 degrees, and moved to the left on the X axis only for a bit of tweaking.
Select all the your patches and mirror them if you need a look ahead at how the front is shaping up.
The material settings are:
- Phong
- Colour is R:103/G:74/B:246
- Specular Level: 40
- Glossiness: 10
- Reflection amount 15
- Lake REM.jpg in the reflection slot
Note the bump on the bonnet of the blueprint; I am bypassing that, it can be bump mapped later in some way, if you want to patch it then you can attack it!
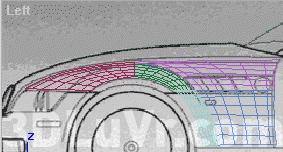
Lets move a bit faster now you should be approaching pro status by now. I have attached and welded all the vertex points for the pieces that used to be Green, Red, Purple,Pale Blue/aqua and Dark Blue.
Follow the arrows in the following picture to show you what directions I went in.
Note: In Back viewport you are seeing a view from the front, just got messed so dont worry about it ;-)
Look at the Camera01 view and notice a curve up and over near the yellow arrow. You'll love this next bit! Copy the front for making a bit of the back!
|
 |
|
|


