|
|
 |
|
Low Poly Modeling for Real Time Added on: Mon Oct 16 2000 |
| Page: 1 2 3 4 5 6 7 8 |
Once you have loaded up the scene you will see a blank scene with man.jpg loaded in the front and side viewpoint. The reason we are using this image is more of a guideline of the human male proportions so we can trace around it and make it into a low polygon 3D model.
First of all go to the create panel and go to the primitives level and create a standard box. It does not really matter what type of box we create since essentially we are going to get rid of the box straight away, we just need an object of some kind so we can get to the edit mesh modifier in the modify panel.
Once you have created the box go to the modify panel and click on edit mesh. Now go to the sub object level and choose vertice. Select all four of the vertices and delete them so we are left with nothing.
What we plan to do niw is begin plotting vertices around the edges of the characters profile. Just in the essential places to build his shape. Essentially we must keep in mind that we want this character bend and deform correctly so placing the vertices at all the correct joints such as the knees, elbows, wrists, neck, chest, shoulder, hips and bikini line is essential.

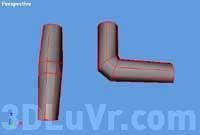
What this symbolizes is the red shows the actual joints that are needed to deform the basic character. The neck, shoulders, elbows, wrists, chest, hips, bikini line, knee's and feet. The blue shows the extra segments which should be added so the knees and the elbows deform correctly. The reason they need extra segments is because otherwise when the arm bends, the bottom of the arm becomes flat. See below
 
If you look above, there is no second segment to give the correct proportion in the elbow and give it boldness after it bends, so without a second segment the elbow sheers and becomes flat, which is very unrealistic. So in the knee and arms it is essential that they have two segments to allow the joints to deform correctly.
|
 |
|
|


